Appwrite using NGINX as Reverse Proxy
Deploy Appwrite on VPS using NGINX as Reverse Proxy with SSL

W
Backend Sorcery & Finance Geeking
Search for a command to run...
Deploy Appwrite on VPS using NGINX as Reverse Proxy with SSL
Backend Sorcery & Finance Geeking
No comments yet. Be the first to comment.
I joined Underdog Protocol as a developer in October 2023, after attending the Solana HackerHouses in Bangalore and Mumbai. Before that, I had worked on a contract basis and as a mentee under the LFX Mentorship throughout the year. This blog is about...

Create Short Name (SNS) for your Solana Public Key

We did so you don't have to

Rusly is a URL shortener built using the Rocket framework in Rust. Checkout RuslyCheckout the Rusly GitHub repo This blog lays out the system design thought process I used while designing and developing the system. Read about the Rust syntactical dev...

If you're willing to contribute to Harbor and/or need its code up & running on your local dev environment then follow along, this guide will get you started. Harbor is an open-source registry that secures artifacts with policies and role-based access...

Appwrite is a self-hosted backend-as-a-service platform that provides developers with all the core APIs required to build any application.
In the previous post, I discussed how to deploy Appwrite on Google Cloud. Now we'll see how to deploy on our Virtual Private Server (VPS).
VPS servers usually host a lot of services so we won't deploy Appwrite on the default ports HTTP(80) and HTTPS(443). If deployed on default, all services will go down and only Appwrite will run or the other services won't let Appwrite run on these ports.
Instead, we'll deploy it on localhost and serve it using NGINX as a reverse proxy.
First, we'll install Appwrite on our server. Appwrite comes as a set of Docker containers. So Docker needs to be installed mandatorily. Depending on your server OS, install Docker by referring to the docs.
Once docker is installed it takes only 1 command to get Appwrite installed.
PS: Don't paste the command and agree to everything by default. Some configs while installing need to be changed.
After running the command it'll pull a.k.a download some container images whose speed will depend on your internet speed so be patient.
sudo docker run -it --rm \
    --volume /var/run/docker.sock:/var/run/docker.sock \
    --volume "$(pwd)"/appwrite:/usr/src/code/appwrite:rw \
    --entrypoint="install" \
    appwrite/appwrite:1.1.1
Learn more about Appwrite installation from the docs.
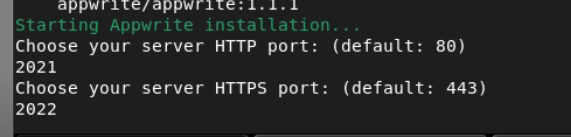
While installing, Appwrite asks for HTTP and HTTPS ports for it to function which default to 80 and 443.
These need to be changed because if kept default all traffic sent to the VPS will be received by Appwrite and all other services hosted won't work.
So in the prompts, as shown below enter any ports from 1025 - 65535. Note that these ports need to be unique and should not conflict with any other ports to choose from accordingly.
PS: Don't choose common values like 3000, 8000, or 8080 because a lot of services default to these ports and will cause you problems later.
In our case let's choose ports 2021 -> HTTP and 2022 -> HTTPS. Make sure no other service is running on the ports you've chosen.
Note: Further on port 2021 is referred to because I've used it here. Make sure you're using the port you've specified.
Rest all values can be kept default for now but should be changed when in production. Learn more about them from the docs
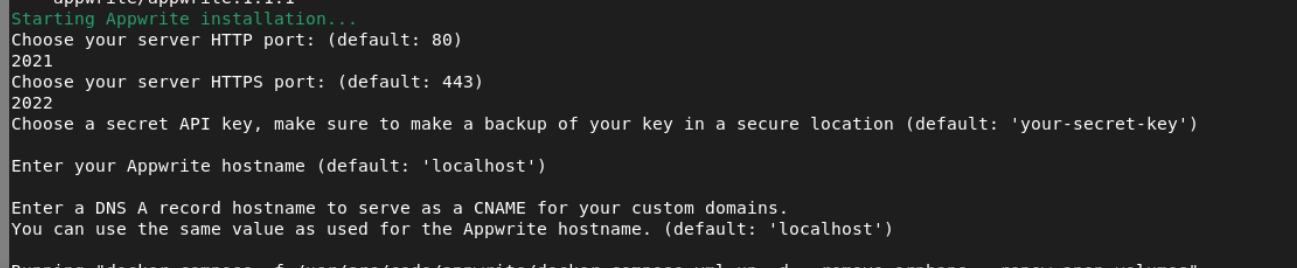
Once all values are provided it'll take some time and Appwrite will be installed.
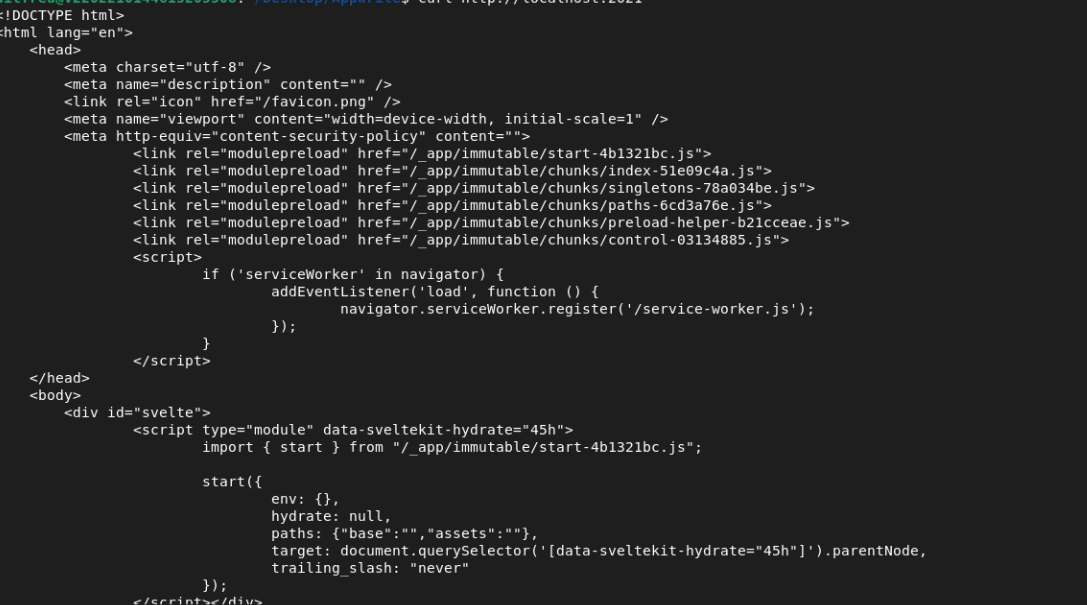
The console will load on the HTTP port specified above. To check if the console loads properly you can load it in the browser if your server has GUI or use curl as follows
curl http://localhost:2021/
If you see HTML code in your console then Appwrite has been installed successfully.
Now to serve it over the internet you can either open the port of your server or use a Reverse Proxy. It might also be directly available on ip:2021 depending on the config of your server.
To open the port you need to allow it in your firewall/iptables. If you're using ufw then the following commands should work
sudo ufw allow 2021
sudo ufw reload
Now if you enter your server ip:port on your browser, Appwrite console will load. For eg. 172.0.0.45:2021
I'd recommend not opening any port and using a reverse proxy as it provides better control and security.
To serve using a reverse proxy you'd usually need a domain configured pointing to your server.
NGINX configs are stored on the directory /etc/nginx/sites-available. Here you can create a new config file or write to an existing config file.
Using your favorite editor open the file. Here we'll be creating a new file named appwrite using vi
sudo vi /etc/nginx/sites-available/appwrite
Write the NGINX config as follows
server{
    listen 80;
    server_name example.com www.example.com;

    location / {
        proxy_pass http://localhost:2021;
        proxy_http_version 1.1;
        proxy_set_header   Host               $host:$server_port;
        proxy_set_header   X-Real-IP          $remote_addr;
        proxy_set_header   X-Forwarded-For    $proxy_add_x_forwarded_for;
        proxy_set_header   X-Forwarded-Proto  $scheme;

    }
}
If you're facing problems while pasting in the editor or exiting it, please learn more about it :)
To exit the vi editor do the following steps:
Press Escape key
Type :wq
Press Enter key
Verify the config is syntactically correct using the command
sudo nginx -t
Following is the command using systemctl
sudo systemctl restart nginx
That's all, Appwrite console will load on the domain you specified.
Note the proxy_pass http://localhost:2021; directive. It is the main reverse proxy config. All traffic received to the domain you specified will be sent to port 2021. That's where we have Appwrite running. Learn more about NGINX from the docs
If your domain URL is a subdomain, just enter it as the server_name value in the config. Also, note the way it's entered above, without http/s and any trailing /
Note: If your domain and server have SSL configured then the console might not load unless you configure SSL.
Depending on your server and domain, you'll need to handle SSL.
The following command will issue SSL using certbot. Learn more about certbot from the docs
sudo certbot --nginx -d example.com
Note: certbot needs port 80 of the server to be open, if it's closed, open it after running the command and close it again.
Following is the command to open using ufw
sudo ufw allow 80
On servers, for best security, it is recommended to always use SSL and keep port 80 closed. However, this depends on the services you're running.
That's it, now you have your own self-hosted Appwrite up and running using NGINX as a reverse proxy.